Chapter 23: Administration of systemic anticancer therapies
Skip chapter table of contents and go to main content
23.4 Extravasation: performing flush‐out following an extravasation
This procedure would begin once the immediate management of extravasation had been performed; that is, stop infusion/injection, aspirate any drug if possible, apply appropriate pack and elevate limb.
Essential equipment
- Eye protection
- Disposable gown
- 20 mL Luer‐Lok syringe × 1
- 10 mL Luer‐Lok syringe × 1
- 5 mL Luer‐Lok syringe × 1
- 25 G needle × 1
- 23 G needle × 3
- Disposable scalpel (size 11)
- Bandage
- Sterile pack (containing gauze, drapes/towels and gallipot)
- Sterile transparent dressing
- Sterile gloves
- Cleaning solution (2% chlorhexidine Chloraprep 3 mL)
- Blunt needle/18 G or 20 G cannula × 4
- Three‐way tap with extension set
- Blank labels for syringes
- Solution administration set
- Sterile marker pen
- Plastic‐backed towel (e.g. incontinence pad)
Medicinal products
- Lidocaine 1% 10 mL (kept at room temperature)
- Hyaluronidase 1500 IU and 2 mL water for injection
- Mepitel dressing
- 500 mL 0.9% sodium chloride infusion bag
- Bactericidal alcohol handrub
- Bactericidal soap
Pre‐procedure
ActionRationale
- 1.Explain the procedure and reason for performing it to the patient and gain written consent using pre‐prepared consent form.
- 2.Ascertain what emergency treatment has been carried out, for example was hyaluronidase administered?To ensure that only required treatment is carried out; for example, if hyaluronidase has been given, no further dose should be administered as this could result in a sensitivity reaction. E
- 3.Assemble all the equipment necessary for the procedure.To ensure that time is not wasted and the procedure goes smoothly without any unnecessary interruptions. E
- 4.Check all packaging before opening and preparing the equipment to be used.
- 5.Carefully wash hands using bactericidal soap and water or bactericidal alcohol handrub before commencement and dry.
- 6.Place the patient's arm on the plastic‐backed towel.To prevent leakage of the flushed‐out solution and possible contamination of the area with cytotoxic drugs. E
- 7.Apply disposable gown and eye protection.To prevent possible contamination of practitioner with cytotoxic drugs. E
- 8.Open a pack, empty all equipment onto the pack and place a sterile dressing towel under the patient's arm.To create a sterile working area. E
- 9.Wash hands using bactericidal soap and water.
- 10.Apply sterile gloves.
- 11.Clean skin with 2% chlorhexidine and allow the area to dry.
Procedure
- 12.Draw up 1% lidocaine in 10 mL syringe and label.To prepare for infiltration of area. E
- 13.Mix hyaluronidase with sterile water in a separate 5 mL syringe.To ensure drug is reconstituted correctly (Joint Formulary Committee 2018, C).
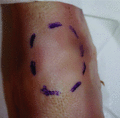
- 14.Mark the area of extravasation with a sterile marker and indicate where the incisions will be made (Action figure 14).To ensure the correct area is treated. E
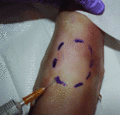
- 15.Using a 25 G needle, make a small bleb at the lowest point of the marked area by inserting the needle intradermally and administering 0.1–2 mL of lidocaine slowly towards the four points of the compass. Allow it to take effect (Action figure 15).To reduce any discomfort to the patient. E
- 16.Then, using a 23 G needle, infiltrate the marked area with lidocaine subdermally towards the four points of the compass. Check with the patient what kind of sensation they can feel, for example sharp or dull, before proceeding.To ensure administration of anaesthetic to area and to ensure anaesthetic has taken effect. E
- 17.Attach a 23 G needle to the syringe of hyaluronidase and infiltrate the anaesthetized area at the four points of the compass.This will facilitate the flush‐out by loosening the tissues. E
- 18.Cut an opening in a transparent dressing that matches the size of the infiltrated area and apply to the patient's skin.To protect the skin from the flushed out cytotoxic drugs. E
- 19.Attach the administration set, three‐way tap and extension set to the bag of 0.9% sodium chloride and withdraw 20 mL via the tap.To prepare the syringe and to enable continued access without having to open the system. E
- 20.Make at least four incisions at the four points of the compass using a size 11 scalpel by inserting the blade straight down to a depth of no more than 0.5 cm and one small incision to use for insertion of the cannula 20 (Action figure 20).
- 21.Gently press on the area.
- 22.Insert the cannula through one of the incisions and push along tissues within the marked area (Action figure 22).
- 23.Remove the stylet, dispose of in the sharps bin and attach the extension set to the cannula.To facilitate the flushing. E
- 24.Flush the 0.9% sodium chloride through – it will exit out of the other incision holes. Pat with a sterile gauze swab, massaging and milking the area at the same time. The area will become puffy and swollen – this is normal (24).
- 25.Draw up more 0.9% sodium chloride and repeat the procedure using a minimum of 100 mL (up to 500 mL) of 0.9% sodium chloride.
- 26.If 0.9% sodium chloride does not flow out of one incision, it may be necessary to remove the cannula from the original incision and insert a new cannula into another incision.To ensure all areas are flushed. E
Post‐procedure
- 27.Clean and dry the area although it will continue to leak.To aid patient comfort. E
- 28.Apply a Mepitel dressing and a loose bandage (do not wrap tightly).To reduce the risk of infection and to prevent compression of the skin. E
- 29.Elevate the limb so that the hand is level with the head until swelling has reduced.To aid reduction of oedema. E
- 30.Discard waste in appropriate containers.To ensure safe disposal in the correct containers and avoid laceration or injury of other staff. E
- 31.Document in the patient's medical and nursing notes and on the flush‐out technique form.
- 32.Discuss with medical colleagues the prescribing of oral antibiotics (flucloxacillin is recommended for reducing skin pathogens) and if necessary analgesia.If the patient is neutropenic they may be more at risk of infection. To minimize pain and discomfort. E
- 33.Refer to a plastic surgeon if there are any problems during procedure or if there are any skin problems.To ensure rapid access for further management. E
- 34.Have a photograph taken if possible.To observe and document for any skin changes. E
- 35.Monitor and review within first 24 hours.To observe and document for any skin changes or infection and provide immediate treatment. E
- 36.Dressing will need to be changed every 48 hours and should remain in situ for up to a week. The skin incisions will heal within 1–2 weeks.To prevent risk of infection. E
- 37.Ensure the patient knows when and how to make contact if they have any problems once at home. Organize for the patient to return for dressing changes at the hospital or with the district nurses. Inform the patient to contact the hospital if:
- the swelling does not reduce
- they have pain
- there is any tingling or numbness in the fingers or arm.
To ensure the patient receives immediate treatment should there be any problems post procedure. E


